


As a Microsoft partner, Snowflake is a powerful tool that offers support for Azure-based data warehousing, including integration and easy access from Azure Blob Storage to Snowflake, easy implementation of data pipelines from Azure Data Lake into Snowflake, and connection with Microsoft Power BI Desktop to visualize analytics. There is no question that businesses seek to improve outcomes and reduce risk, and we’re here with this guide to share some steps you can take to set up your data warehouse with Snowflake on Microsoft Azure.
1. Create your Snowflake account through Azure
First, click the option to create a new account and make sure to select “Microsoft Azure” in the last drop-down field for Azure integration benefits and to avoid inbound and outbound network transfer fees from Amazon AWS. You’ll be asked to share your credit card information, but the transaction is only for verification to try out the Snowflake trial period. You can then start the provisioning process after you click the registration page.
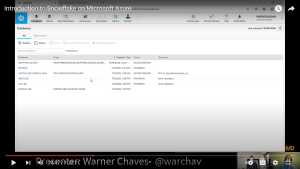
In the Snowflake Management portal, you’ll see three main components and options to use: Databases (including samples to use for testing), data warehouses (to create or resize), and worksheet (an SQL panel to run ad-hoc queries)
Here’s a snapshot of what your Snowflake interface will look like:
2. Managing your Snowflake virtual data warehouse
Resizing your data warehouse
When you are resizing your data warehouse, go to the “Warehouses” section, select “COMPUTE_WH” warehouse and then “Configure”. You can then change the size of your warehouse to match your need.
A capability that you’ll want to use is selecting the best time to resize your data warehouse. You may need it bigger during times when you have more volumes of data to filter through, but you can also scale it down when there are seasons of lower volumes of data. Resizing a warehouse to a larger size is useful when the operations you’re looking to perform need more compute resources and can improve the performance of large, complex queries against large data sets. With this agility, you can improve performance while loading and unloading significant amounts of data.
Using your data warehouse
To execute a query or statement in Snowflake, a warehouse must be up and running, and as a user, you’ll need to specify which session the query or statement is submitted. Remember that a Snowflake session can only have one current warehouse at a time (if you need to change or specify the current warehouse, you’ll have to use the USE WAREHOUSE command)
Note: the syntax: USE WAREHOUSE <name>
3. Download Snowflake drivers
After managing data warehouses, the next step is to look into connecting 3rd-party tools and technologies that form the extended ecosystem with Snowflake. The tools and drivers are available for you to download (you can find them in the “Help” icon). The Go Snowflake Driver provides an interface for developing applications using the Go programming language to connect to Snowflake and perform all standard operations.

Snowflake’s cloud-based data warehouse platform enables instant, secure, and governed access to an entire network of data. It supports various data workloads for developing modern data applications in an efficient and cost-saving way. With Snowflake data warehouse, companies can realize a single source of truth to enhance data quality and improve decision-making processes. Given that this is simply a basic guide, there’s a lot more that is left unwritten and can be complicated to practically execute without technical guidance and support.
4. Configure network access settings
Data access controls are part of the data governance for databases, which are necessary to protect data from unauthorized access and usage. You can create a network policy through the web interface or using SQL, and you’ll also need to have the necessary permissions as only administrators or higher can create or alter network policies. According to Snowflake’s documentation, they recommend designating at least one other user as an account administrator. This helps ensure that your account always has at least one user who can perform account-level tasks. Moreover, Snowflake also strongly recommends using Multi-Factor Authentication (MFA) for any user login to ensure the highest level of security, and this can include account admin as well as security admin and system admin as well. You can also have the capability to set future grants and privileges depending on the extent of authorization and visibility of the user. For more detailed guidelines and rules, check out the Snowflake documentation on access control.
If you are interested in moving further on, CloudMoyo offers a FastTracktoValueTM Implementation with a technical and robust step-by-step methodology to help companies implement Snowflake on Azure.